; Tin Can Canoe: Crafts
Showing posts with label Crafts. Show all posts

Friday, June 26, 2009

Please, Allow Me to Introduce You...

O.M.G.
Have you ever seen anything so Stinkin' CeUte?
No? Not Ever?
I didn't think so.

Well... now you have.

So, all you need to complete your day is to check out the truly adorable Socktopus page and all the super swell sockorama kits they have available. Of course, you just can't beat the Deluxe Socktopus. Withoutta a doubt, hands down, and by far the spiffiest damn plush I've seen all year!

Totally stellar kits can be had for under 25$.
Whatta Steal.

Wednesday, June 24, 2009

Frayed Fabric Flower Tutorial... More Rolled Roses


I love anything that's got a raw edge... fraying is a Good Thing folks!
You can only imagine the sheer delight I experienced in discovering
this hip new tutorial on Frayed Edge Flowers!

Let's talk - Wicked. Ass. Cute.

Better yet... they're easy, peasy, lemon squeezey.
So head on over to Sis Boom blog and discover the Rapture that awaits you!

And while you're at it... take a look at another divine rolled rose tutorial.

Sunday, August 3, 2008

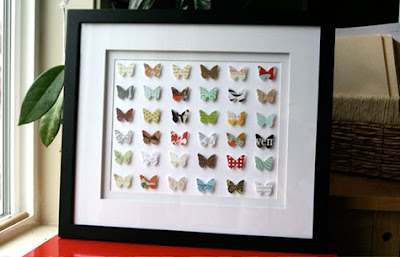
Flutterbys Collage O' Prints...

Here's a really super idea.

I've done something very similar by layering various sized circle punches - stunning results that looked a lot like a Stacked Circle quilt. Too Fun. Also did one using a cute overalls punch for a friend's nursery. Haven't seen the Butterfly punch before now... lovely. I'm thinking terrific for the guest bath OR perhaps the laundry room. I'm totally loving this.

Simple. Elegant. Easy! What could be better?

[click on above image for tutorial]

Monday, July 28, 2008

Rolled Fabric Roses... Adorable!


Here's a really fabulous Rolled Fabric Rose Tutorial by Portabello Pixie!!
Super Duper easy and with results that are just too much fun! A terrific embellishment for a jacket, purse, backpack... My mind is simply racing with all the endless possibilities ;)

Maybe you've got a little girlie who would love these... or perhaps, you're like me & just want them all for yourself. Click on the logo at the top for designer info...

Sunday, July 13, 2008

Crochet... Doily Making


Some folks may hear the word "Doily" and cringe. They may think old fashioned and lace with frills. But not me. I adore Doilies! My mom had them on every table while I was growing up, under every lamp. They're beautiful and stunningly elegant in Ecru or Ivory.

Some years back... I forget how many. 10? 15? Somewhere in the middle? My Gram came to visit me while I was living in Washington state. For Three Glorious weeks. We traveled all about like vagabonds during that wonderful visit... Seattle, Portland, Snohomish, Victoria BC. It was busy, busy, busy and quite delightful.

But truly... my most treasured memory from that visit - My Gram taught me how to crochet doilies. Over those three weeks together we made about 4 dozen doilies just like these [I probably made 3 while Gram made the other 37]. She was giving them as gifts that year... for her local Senior Center, I think. Sure, I already knew how to crochet... but had never quite figured out how to read the pesky diagrams on doily patterns. Mom had tried & tried to show me, but in the end it merely took a nudge from my Gram. She had brought this brilliant pattern with her and was very patient and willing to work through all the many mistakes I made. I really loved how delicate the stitches were, the teeny hook and the feel of the thread on my fingers. My first introduction to the art literally got me hooked! I'm a lot faster at working them up these days... but nothing like dear Gram - that woman can crochet like the wind!! It's amazing :)

This past week I decided to change out the stone tiles we've been using under our bed side lamps. I looked through about 50 doily patterns, all of which were very lovely. Yet once again decided upon this Divine pattern from Gram. It made my heart so happy to work on this pair!


While I worked away I could recall all the music we listened to during those weeks [Nanci Griffith was a Fave for us both at the time & I got her hooked on the Indigo Girls], the stories we shared and all the side splitting laughter we enjoyed. We've always gotten along like school girls - my Gram & I, despite our 50 year age difference. I cherish all our visits together but this one was a particularly magical time for me. And probably goes a long way to explaining why whenever I make a doily... 9 times out of 10 this is the one I choose!

Monday, July 7, 2008

Socks, Socks, Socks, Monsters.... Socks, Socks, Socks

Socks!! Normally, I leave them in a basket for Dahling Husband and usually he's quite swell at finding all their mates. But after working through more loads of laundry than I'd care to admit to, I've decided that My Sweetheart 'Somebody' simply has faaaaaarrr too many of Them. And they Must Go!

I'm drowning in socks!! What's one to do... Well, for starters... THIS - weed'em out!! I'm not keen at all on matching socks... it's Sooo not my idea of a good time. Not Ever. Not filled with rocks, Not crammed with clocks, Not stuffed with blocks, Not on a Fox... but Yes! Very good! In a Box!

So with that said, this is what's left. A nice sized small box over flowing with socks. Most of these are loners now, but still in good repair... What to do now?? Well, for starters.... THESE - use'em up!

Two Very Hip and Fun Festive Books! Now that I'm done wrestling with socks, I hope to wrestle up some time and get a few of these wonders whipped up!! Brilliant :) And with any luck, I'll have reviews for each title as well... I know, I know... it's difficult to contain your enthusiasm!

Sock and Glove
and...and...and...and...and
Stupid Sock Creatures

Tuesday, June 24, 2008

Book Review... Pretty Little Pincushions

Pretty Little Pincushions Price: 12 Bucks and some Change

I picked up this super cute book a few months back and think it's really too adorable for words. It's chalk full of terrific inspiration and I found the directions for 2 of the projects I've made (thus far) to be easy to follow. Although, honestly - I didn't follow them so much as just look at the pictures for guidance.

Know in advance that there's nothing earth shattering going on here - no one is reinventing the wheel. However, the ideas act as a spectacular springboard and with more than 25 projects featured this book is an absolute steal at this price point. Most of the patterns could be easily manipulated into something similar yet substantially different... different sizes, different materials, different embellishments. Inspiration Galore! Lots of good fodder to get your creative mojo flowing. I heartily recommend it!

For my first project I chose to do the cushion featured on the cover - it's a cinch. Good diagrams and clear instructions - I only needed to read through them once and then just referred back to the photos for reassurance. I could have gone hog wilde with the stitching but (since this is for a very specific friend) I kept it simple. Just about the only thing I did different was add a weighted pocket to the inside. I like a cushion that holds it's ground :) I did all my sewing by hand and it still took under an hour. (perhaps a wee bit longer adding in the embroidery, cuz I'm super duper slow at that)

I think for my next version of this cushion I'm going to use printed cottons and whip it up on my sewing machine. I'm thinking really cute raw edge seams with delightful patchwork sides! For embellishment I'll use some of my fancy dancy machine fonts (stitches). I'm tellin' ya, endless possibilities!

So check it out! I promise you'll love it, so many clever ideas... Very fun projects which would be outstanding quick gifts for anyone special on your list, including yourself! I'm dying to do the little porcupine cushion - which I think looks a lot like a hedgehog. Absolutely Too Damn Cute!
Ooh, or the Voodoo Doll Cushions! Hysterical.


Do you have a Super sweet craft related book that you love? New or Old?

Drop me a line & tell me all the sordid details - Share the love!

I'm always looking to add to my ever growing library :)

Thursday, June 19, 2008

Out the Window...

Okay... so for about a month now I've simply been just dying to go to the Pile of Craft event in Baltimore MD.

There are so very many hip and happenin' artists participating! One of which is Cotton Monster... I've been coveting her stuff for ages now. I totally thought this would be a stellar way to pick up one up one of her utterly amazing creatures for my little NutMan. With the added bonus of having a totally kick ass, rock your world weekend in the D.C. area. What could be better?!

Yeah, sure... turns out, lots could be better.

Wouldn't you just know it... Darling P came home from work yesterday with news that my illustrious weekend plans were so completely out the window.

WHAT!!??? Screams I.

At this point there may have been some profanity used... but I'm pretty sure my cerebrospinal fluid (the goop around your brain) began to boil at this stage. Honestly, I really can't remember much after I regained my composure and was able to pull myself from up off the floor.

So not only do I NOT get to go do something I've been yearning and churning to do for the whole entire month -- Major bummer! I also get to stay home alone for a full week with my 2 year old in the pouring rain while Husband gets to go here:

To Yokohama, Japan... Where The P will be... without Me. (sigh)

I gotta tell ya, I really am excited as hell for him! The lucky dratmeister! I'm also absolutely and totally jealous. I would so love to go... if only H Man were a wee bit older. Of course it's a business trip, so it's not all fun and games for The P... but it should still prove to be a radical adventure for him :)

But I'd be lying if I said I wasn't feeling a little bit of disappointment over my rockin' weekend getting squashed. So if you've got the weekend free and happen to be in the Baltimore area - Please go and check out this Ultra Hip Indie Art Fest!

Take loads of photos & then be kind enough to share them with me?

Pretty Please?

Monday, June 2, 2008

Polymer Clay Pendants ... Today's Craft Lab

Today while my little guy napped I managed to start and Finish! four of these sweet little Polymer Clay Pendants. Each piece is approximately 1" square and is a tiny Polymer Rorschach panel that's encased in a polymer bezel and bail. 100% Fimo clay, no paints were used. I've added a matching PC bead and strung them on rat tail cording. They were a lot of fun to construct and think they turned out nicely, I love to design on the fly. They have such a lovely smooth finish and are so light weight. I'm not sure what I'll do with them... perhaps a few folks would like to swap. I'm always up for receiving cool Art in my letter box. Either way, Enjoy :)


Friday, May 23, 2008

Buried Treasure...of Sorts

Sometimes unpacking boxes you didn't pack can be frustrating. Like when I found the free weights from my treadmill in a fabric box from the studio. Since these items were located in two different rooms on opposite sides of our old house... well, it really makes you scratch your head. So imagine my surprise today while I was unloading a box from our old up stairs linen closet and unearthed this beauty! A half done project that I'm pretty sure was in my "gonna get done someday" cabinet in our old family room (you know, the work on while watching a movie projects)... which were not only on opposites sides of the house but also on different floors. I don't pretend to understand it... but was delighted by the discovery.

Of course, as with anything you come back to at a much later time, it's difficult to remember what the original inspiration was or what you had in store for it. The doubts creep in - like, would you still choose the same colors or composition. That's an upside of selling your work - you never get the chance for self doubt after the fact. This poor thing has been "under construction" since my little guy was born... eh, he's two now. Well, it's no wonder really - what nimrod thought all this random (takes an eternity) stitching was a good idea for somebody whose as quick as a snail with rigor mortis at handwork ... Don't look at me.

If I don't come up with a plan for this one soon... perhaps someone out in Never Land has an idea and would want to take over.

Thursday, May 22, 2008

Ukrainian Eggs -- Pysanky

This spring I got together with a group of ladies and made my first Pysanka (Pysanky is plural) egg. It was so much easier than you'd think to get started - all that's required is an egg, a candle, some beeswax, dyes, shellac, and a kistka (stylus) tool. You can opt for a pencil to sketch in your design...but you have to mark really lightly (or your markings might show through the dye). I don't know about you - but I'm one of those folks who constantly break lead in a mechanical pencil and on a good ol' fashioned wood pencil I'm resharpening it with every new paragraph. A less wordy version would be: I press too hard and the egg is uncooked...thus I skipped the pencil bit. Besides, I work better without a plan.

What a totally cool craft this is! I enjoyed it so much that I've ordered the basic supplies from All Things Ukrainian and look forward to doing lots of these. I think most folks do them primarily around Easter... but it's too enjoyable to not do year round. It's shamefully easy although definitely involves a learning curve and requires some practice. My hostess (who was Ukrainian) had some beautifully done eggs, some of them Ostrich, that were museum quality and stunning. It's interesting that although the art is two dimensional, it can exhibit some of the very same details and lovely intricacies accomplished with textiles. I think most quilters would go ape using this medium, a lot of the patterns and designs would cross pollinate beautifully.

My egg: Note this is my first attempt and knowing what I know now - I would have dyed my egg a color before I began. I didn't care for the lack of contrast that white gave against all the vibrant colors in the end. Live and learn...

If you're interested here's a terrific online Beginner Class I discovered that is very helpful and a great outline to get you going if you're a newbie.

Saturday, May 17, 2008

Funky Baby Tag Toy Tutorial

I just found out a friend is expecting! Which is wonderful, but since I don't know how many people she's told - I don't wanna pull a "Jack Black" and OUT her to the world. So Mum's the Word. I figured the first idea for her is so simple and fun it'd make a great tutorial for those who'd like to follow along :) This is my first online tutorial & I'll try to be less chatty than I am in the classes and workshops I teach. It should all make sense in the end and like all directions - Always read them all the way through a few times before you begin. If you have questions just raise yer hand.

The prep work:

My little guy loved chewing on the tags of everything when he was a Babe...so that was as good a place as any to start and it helps to know the wee bun is femme.

A few good rules of thumb: Tie knots in long dangle tags, it gives little ones something to grab a hold of and they really love to gnaw on the knots. Also make sure that several of your Tags are actually loops - so folks can run a clip through them and attach them to car seats, strollers and the like. Try out different sorts of fabric textures... corduroy, minkie, felt, etcetera to keep baby engaged. I did patchwork and chenille but you could easily do it out of just two solid pieces of material - make it as easy or as difficult as you'd like. A few words on copyright -- this original design is my own so be kind, be respectful and be Cool like The Fonz...."Heeeey". If you want to use a photo please provide a link back or if you're not sure just ask, I'm friendly. It's easy to play nice...you know the whole "do unto others..." concept.

[History: I keep all the scraps from everything I do (yes All - even the shockingly teeny ones) - sick as it is, it's true, true, true - so what are you gonna do. I color coordinate the scraps & keep them all stored in ziplocks. This proves to be an ingenious way to organize them and helps a lot when it's time to use them up. Think recycle, upcycle or unicycle... whatever floats yer boat. ]


I dug out a few of my pre-coordinated scrap bags and Got Busy on some random little patchworks. Then found a complimentary scrap of chenille for the back. Note: You don't need a pattern honestly...just free yourself to sew all Willy Nilly like - I promise you'll love it. Still in doubt - then look on the internet for a free Crazy Patch Block Pattern. My Patchwork block is 8" square and my Chenille back is 6.5" square. I used 3 long knotted tags (8", 6" and 4"), 1 ear folded loop (5" long before folding), 2 tags (2.5" long) and 1 loop (3" long before folding). I always use a 1/4 inch seam unless other wise noted.


1) Sew your patchwork (aka: The Front) roughly an inch or so - don't be fussy - larger than your chenille (aka: The Back). Then decide on a shape...you could leave it square or make it round or triangular...I chose to just round the corners of the chenille piece ONLY. Cool Trick: No matter what shape you choose Leave your Front Patchwork piece larger & uncut. You'll see why in a few steps down...

2) Next start construction on all your taggie bits. You decide how many you'd like and then make them all different sizes and lengths - this is more Willy Nilly...set yourself Free sewing. Basically for Loops all you're doing is making tubes by sewing right sides together and turning them inside out. It's a pain but buck up unless you're gonna make like 20 of these, then get yourself a set of Tube Turners (type "tube turners" in their site search box). They're a cool investment if you want to pony up the cash. (Here's a great Link that shows you how they work)


Still on 2) To make tags use a Loop tube and sew one end shut. Trim the corners off before you turn them inside out.


3) Still with me? Once you've got all your Taggie bits done go make a sandwich. (Okay, if you really need a PB&J I'll wait... did you wash your hands?) Pin all your Loops and Tags to the Right side (ie: the fuzzy side of the chenille) of your BACK piece and make sure their ends hang over the edge a bit (to ensure they get caught in the seam correctly), they're all pinned towards the inside, and that none of them sneak off the opposite edge (example: in the photo below the long yellow knotted tag on the bottom is dangerously close to the Opposite edge and will most likely be sewn into both edges - not a good idea, trust me) if you need to keep them safe pin 'em down in the middle.

4) Once everything is pinned in place - lay it face down (think right sides together) on Top of your Patchwork piece. Leave all the pins in there but add some more and pin everything together - making a sandwich.

5) Sew the sandwich together. Remember to leave a gap roughly 1.5 inches to turn it inside out. Now this is where that Cool Trick comes in. Bulky sandwiches sometimes shift with the feed dogs even if they're pinned. If you leave one side of your sandwich larger than the other you don't have to worry about your edges being spot on even while you sew them together. You can clearly see what's going on, thus know everything is being caught in the seam. Before turning it inside out, trim the excess off the larger piece. Cool no?

6) Stuff it! Any sort of poly fiber fill will do just fine. Note about stuffing: If you want to avoid the cellulite look on your new softie use one huge wad of stuffing. Meaning grab insanely more than you think you'll need - instead of using a little and then a little more and a still a little more...we're talking one enormous hunk of filling. You can always pull off the extra but this makes the stuffing nice and smooth and alleviates the lumpy bumpy appearance. Then before you stitch up your opening with a nice hidden stitch add a squeaker and/or small rattle object in the center. Voila!


See what I mean ...easy peasy lemon squeazy! Go knock yourself out and make a few. Remember to not be so fussy about every little detail and have some fun :) Thanks for visiting and sticking through such an insanely loooong post - enjoy!