; Tin Can Canoe: Handmade
Showing posts with label Handmade. Show all posts

Friday, June 26, 2009

Please, Allow Me to Introduce You...

O.M.G.
Have you ever seen anything so Stinkin' CeUte?
No? Not Ever?
I didn't think so.

Well... now you have.

So, all you need to complete your day is to check out the truly adorable Socktopus page and all the super swell sockorama kits they have available. Of course, you just can't beat the Deluxe Socktopus. Withoutta a doubt, hands down, and by far the spiffiest damn plush I've seen all year!

Totally stellar kits can be had for under 25$.
Whatta Steal.

Wednesday, June 24, 2009

Frayed Fabric Flower Tutorial... More Rolled Roses


I love anything that's got a raw edge... fraying is a Good Thing folks!
You can only imagine the sheer delight I experienced in discovering
this hip new tutorial on Frayed Edge Flowers!

Let's talk - Wicked. Ass. Cute.

Better yet... they're easy, peasy, lemon squeezey.
So head on over to Sis Boom blog and discover the Rapture that awaits you!

And while you're at it... take a look at another divine rolled rose tutorial.

Thursday, June 11, 2009

Jeff Claassen and His Krink...

I find stuff like this so amazingly inspirational.
Creativity on the fly.
No planning. No thinking. No Fear!

It's awesome.
Let Loose... Be Free... Create!

Krink markers are Seriously Cool.

Tuesday, June 9, 2009

Dirty Hands...


Ahhhh... What's Not to Love?
Thrown Pottery... Etsy... Groovy Background Music... Life is Good.

Now be honest.
It really makes you wanna get your hands Dirty doesn't it ;)
She Rocks.
And her Pottery is Awesome too.

Friday, February 20, 2009

Scraps for a Memory

Wow... Here's a really simple and totally splendid idea for using up some of those gazillion fabric scraps you've been accumulating... Create a Memory game out of them!!


Proving to be both a delightfully textural and visual treat.

Isn't it just The Bomb!
Absolutely love it!

I've got a bundle of scraps from the last "I Spy" quilt I made that would just be too perfectly suited for this task. So Go On! Take a stroll over to Inchmark's and discover the fun for yourself!

What a totally Stellar idea... Love, Love, Love it!
And you will too --- Guaranteed :)

Monday, November 17, 2008

Baby Stella Takes a Trip...

I've been coveting and hoarding this adorable fabric for about 3 years now. It was just too sweet and too pastel for my little guy. So when my cousin recently had a little girl (whom she named after our Gram) I knew the time had come - it was time to part with it. I absolutely adore the little house fabric on the back - which was honestly the toughest piece to let go of :)

So anyhow... this is what I've been working on. The pattern is called A Trip Around the World and is shamefully easy to do. Once you've got all your cutting completed it goes together in just a few hours! Here's a great link on how to get started on your very own - Tripster. Your results will vary drastically depending on the fabrics you select. I quilted it on my Gammill Classic Long Arm - which is really my favorite part. I love the art of free motion. Binding, however, is another story - I absolutely Dread doing binding!! And then, for some fool reason I decided to to hand stitch the binding... Ugh! What was I thinking... I'm super slow at it and don't find it as relaxing as most folks do. So in the end when I had finally finished the binding I was so sick of the project that I hurriedly got it all boxed up. Today I realized I hadn't taken any photos... after it's been squished up in the box for a few days waiting for the post.

So you'll have to excuse the creases...


Here's hoping Baby Stella will get years of enjoyment out of this sweet little number!

(Click on each photo for better detail)

Wednesday, August 13, 2008

Super Simple Patchwork Basket Tutorial

Adorable and Handy. You just can't beat that combo! This pattern is very simple and extremely similar to one of my most favorite bag patterns. Let's talk Easy Peasy and goes together in about an hour - or less. Easy to alter and fun to embellish the hell out of. I love to use a lot of my fancy machine stitches on either side of the checkerboard seams. Also a Terrific way to use up a lot of those scraps we've all got just lying about! Take a stroll over to Pink Penguin and get going on her amazing tutorial.

But be careful... this pattern is so delightful you won't be able to stop at just ONE!

Sunday, August 10, 2008

Froggie Washcloth...

Handmade Froggie Washcloth.
Isn't this just the cutest thing ever! Love, love, love it!
Super Duper easy to whip up and just as simple to alter -
I'm thinking Washcloth Bunnies, Dogs, Lions, Ducks, Kitties...
Endless possibilities. Too much fun.
The incredibly simple tutorial is this way!

Sunday, August 3, 2008

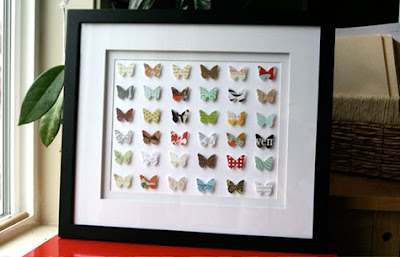
Flutterbys Collage O' Prints...

Here's a really super idea.

I've done something very similar by layering various sized circle punches - stunning results that looked a lot like a Stacked Circle quilt. Too Fun. Also did one using a cute overalls punch for a friend's nursery. Haven't seen the Butterfly punch before now... lovely. I'm thinking terrific for the guest bath OR perhaps the laundry room. I'm totally loving this.

Simple. Elegant. Easy! What could be better?

[click on above image for tutorial]

Monday, July 28, 2008

Rolled Fabric Roses... Adorable!


Here's a really fabulous Rolled Fabric Rose Tutorial by Portabello Pixie!!
Super Duper easy and with results that are just too much fun! A terrific embellishment for a jacket, purse, backpack... My mind is simply racing with all the endless possibilities ;)

Maybe you've got a little girlie who would love these... or perhaps, you're like me & just want them all for yourself. Click on the logo at the top for designer info...

Sunday, July 13, 2008

Crochet... Doily Making


Some folks may hear the word "Doily" and cringe. They may think old fashioned and lace with frills. But not me. I adore Doilies! My mom had them on every table while I was growing up, under every lamp. They're beautiful and stunningly elegant in Ecru or Ivory.

Some years back... I forget how many. 10? 15? Somewhere in the middle? My Gram came to visit me while I was living in Washington state. For Three Glorious weeks. We traveled all about like vagabonds during that wonderful visit... Seattle, Portland, Snohomish, Victoria BC. It was busy, busy, busy and quite delightful.

But truly... my most treasured memory from that visit - My Gram taught me how to crochet doilies. Over those three weeks together we made about 4 dozen doilies just like these [I probably made 3 while Gram made the other 37]. She was giving them as gifts that year... for her local Senior Center, I think. Sure, I already knew how to crochet... but had never quite figured out how to read the pesky diagrams on doily patterns. Mom had tried & tried to show me, but in the end it merely took a nudge from my Gram. She had brought this brilliant pattern with her and was very patient and willing to work through all the many mistakes I made. I really loved how delicate the stitches were, the teeny hook and the feel of the thread on my fingers. My first introduction to the art literally got me hooked! I'm a lot faster at working them up these days... but nothing like dear Gram - that woman can crochet like the wind!! It's amazing :)

This past week I decided to change out the stone tiles we've been using under our bed side lamps. I looked through about 50 doily patterns, all of which were very lovely. Yet once again decided upon this Divine pattern from Gram. It made my heart so happy to work on this pair!


While I worked away I could recall all the music we listened to during those weeks [Nanci Griffith was a Fave for us both at the time & I got her hooked on the Indigo Girls], the stories we shared and all the side splitting laughter we enjoyed. We've always gotten along like school girls - my Gram & I, despite our 50 year age difference. I cherish all our visits together but this one was a particularly magical time for me. And probably goes a long way to explaining why whenever I make a doily... 9 times out of 10 this is the one I choose!

Wednesday, July 9, 2008

Patchwork Skirt...


So although my back isn't exactly up to the rigors of sewing just yet and my Get Busy sewing time is fairly limited these days as well... Can't a girl dreaam. And when I do I'll dream about this skirt. I'd prolly want mine a bit longer, like somewheres just about what they call "Tea" length. Why on earth do you suppose they call it that anyhow?? Any ideas??

Regardless of whatever length you want -- Dammit Jim! It's too adorable, ain't it. Such a very, very Ultra cool way to use up all the scraps we've all been saving up.
Reuse, Recycle, Rejoice!!

She's also got a super awesome tutorial on the how-to's...
so grab your gear and follow me... Most excellent!!
Enjoy ;)

Tuesday, June 17, 2008

Spaceman PJs... Handmade Even!

The only thing better than new PJs are brand new PJs hot off the sewing machine from G'ma!
My Mom made all our PJs growing up and I'm so elated that she still wants to make them for Mister H. There is so much attention to detail - coordinating cuffs and pockets, bitchin' mother of pearl snaps... I'm a total material hound & absolutely love the combos she puts together.
They're all kinds of wonderful - we Adore them!

Thanks Mom! I'm so delighted you're so Crafty and Sweet and Thoughtful!!


Of course lil' H is just like:

"Oh come on! For the love of Pete!
I'm so tired of the blog paparazzi!

Will this incredibly cheesy hammed up mug make you stop!?

Let's watch the movie already, Geesh!"

**Note- what's little NutMan holding there? Be still my beating heart. A handsome young man holding a Lunch Box?! Oh My.

Yep, darling P came home from a recent business trip bearing gifts. Shiny new Lunch Box Tins!! One for me & one for H Man. Sweet huh! Boy's off to a good start for his own little collection :)**

Sunday, June 8, 2008

Procrastination Crossroads...

Sometimes it's just so difficult to find some free time for crafty endeavors these days. I know, I know... you've noticed. There are so many diverting things to fill up all that quickly passing time... Mister H, Blogs, My new Camera, Baking, (not so fun) House Chores, Mommy Duties, Pet Detail, Gardening... Yeah, you get the idea. Your days are probably a whole lot like mine. Doing what you can to squeeze a few more moments for yourself out of each day. If not because of your kids, then because of your job or other responsibilities.

I stayed up late the last few nights - which I love to do. I'm a total night owl and am much more creative after 10pm... it's certainly a heckuvalot harder to do with a Two year old around. Those mornings come all too soon the older I get. Anyhow, I've recently been ogling some really fun fat quarters I've had for ages now, and decided to start cutting them up. They're all woven plaids in glorious sherbet like colors. Although they're Silkies, which make them a bit more difficult to work with, I think they're worth the extra effort. I decided to work up a variation of the Purina Dog Chow logo - the block's got a name, but it eludes me at the moment. Anyhow, this is a very fun variation and goes together pretty quickly. I Managed to get all the hundreds and hundreds and hundreds of pieces cut (Seriously! It totally felt like that many) and got started on the chain stitching... then the blahs began to overwhelm me. How boring. Sigh, Big Sigh. How many more of these are there? A thousand? I really hate doing the same task over & over again. Repetition isn't such a good thing for me, I don't much enjoy it. Ugh. Shamefully, after getting about 8 blocks completed I ran out of steam altogether.

So now I'm at the all too familiar procrastination cross roads... What to do, what to do. The plan was for a lap quilt. But ghads, we have sooooo very many quilts (I *love* quilts, I make too many quilts) - so that's not proving to be much motivation. Here I sit... 8 blocks down, lots more of them in fragments. Looks like I'll be thinking on this for a bit.


Monday, June 2, 2008

Polymer Clay Pendants ... Today's Craft Lab

Today while my little guy napped I managed to start and Finish! four of these sweet little Polymer Clay Pendants. Each piece is approximately 1" square and is a tiny Polymer Rorschach panel that's encased in a polymer bezel and bail. 100% Fimo clay, no paints were used. I've added a matching PC bead and strung them on rat tail cording. They were a lot of fun to construct and think they turned out nicely, I love to design on the fly. They have such a lovely smooth finish and are so light weight. I'm not sure what I'll do with them... perhaps a few folks would like to swap. I'm always up for receiving cool Art in my letter box. Either way, Enjoy :)


Friday, May 23, 2008

Buried Treasure...of Sorts

Sometimes unpacking boxes you didn't pack can be frustrating. Like when I found the free weights from my treadmill in a fabric box from the studio. Since these items were located in two different rooms on opposite sides of our old house... well, it really makes you scratch your head. So imagine my surprise today while I was unloading a box from our old up stairs linen closet and unearthed this beauty! A half done project that I'm pretty sure was in my "gonna get done someday" cabinet in our old family room (you know, the work on while watching a movie projects)... which were not only on opposites sides of the house but also on different floors. I don't pretend to understand it... but was delighted by the discovery.

Of course, as with anything you come back to at a much later time, it's difficult to remember what the original inspiration was or what you had in store for it. The doubts creep in - like, would you still choose the same colors or composition. That's an upside of selling your work - you never get the chance for self doubt after the fact. This poor thing has been "under construction" since my little guy was born... eh, he's two now. Well, it's no wonder really - what nimrod thought all this random (takes an eternity) stitching was a good idea for somebody whose as quick as a snail with rigor mortis at handwork ... Don't look at me.

If I don't come up with a plan for this one soon... perhaps someone out in Never Land has an idea and would want to take over.

Saturday, May 17, 2008

Funky Baby Tag Toy Tutorial

I just found out a friend is expecting! Which is wonderful, but since I don't know how many people she's told - I don't wanna pull a "Jack Black" and OUT her to the world. So Mum's the Word. I figured the first idea for her is so simple and fun it'd make a great tutorial for those who'd like to follow along :) This is my first online tutorial & I'll try to be less chatty than I am in the classes and workshops I teach. It should all make sense in the end and like all directions - Always read them all the way through a few times before you begin. If you have questions just raise yer hand.

The prep work:

My little guy loved chewing on the tags of everything when he was a Babe...so that was as good a place as any to start and it helps to know the wee bun is femme.

A few good rules of thumb: Tie knots in long dangle tags, it gives little ones something to grab a hold of and they really love to gnaw on the knots. Also make sure that several of your Tags are actually loops - so folks can run a clip through them and attach them to car seats, strollers and the like. Try out different sorts of fabric textures... corduroy, minkie, felt, etcetera to keep baby engaged. I did patchwork and chenille but you could easily do it out of just two solid pieces of material - make it as easy or as difficult as you'd like. A few words on copyright -- this original design is my own so be kind, be respectful and be Cool like The Fonz...."Heeeey". If you want to use a photo please provide a link back or if you're not sure just ask, I'm friendly. It's easy to play nice...you know the whole "do unto others..." concept.

[History: I keep all the scraps from everything I do (yes All - even the shockingly teeny ones) - sick as it is, it's true, true, true - so what are you gonna do. I color coordinate the scraps & keep them all stored in ziplocks. This proves to be an ingenious way to organize them and helps a lot when it's time to use them up. Think recycle, upcycle or unicycle... whatever floats yer boat. ]


I dug out a few of my pre-coordinated scrap bags and Got Busy on some random little patchworks. Then found a complimentary scrap of chenille for the back. Note: You don't need a pattern honestly...just free yourself to sew all Willy Nilly like - I promise you'll love it. Still in doubt - then look on the internet for a free Crazy Patch Block Pattern. My Patchwork block is 8" square and my Chenille back is 6.5" square. I used 3 long knotted tags (8", 6" and 4"), 1 ear folded loop (5" long before folding), 2 tags (2.5" long) and 1 loop (3" long before folding). I always use a 1/4 inch seam unless other wise noted.


1) Sew your patchwork (aka: The Front) roughly an inch or so - don't be fussy - larger than your chenille (aka: The Back). Then decide on a shape...you could leave it square or make it round or triangular...I chose to just round the corners of the chenille piece ONLY. Cool Trick: No matter what shape you choose Leave your Front Patchwork piece larger & uncut. You'll see why in a few steps down...

2) Next start construction on all your taggie bits. You decide how many you'd like and then make them all different sizes and lengths - this is more Willy Nilly...set yourself Free sewing. Basically for Loops all you're doing is making tubes by sewing right sides together and turning them inside out. It's a pain but buck up unless you're gonna make like 20 of these, then get yourself a set of Tube Turners (type "tube turners" in their site search box). They're a cool investment if you want to pony up the cash. (Here's a great Link that shows you how they work)


Still on 2) To make tags use a Loop tube and sew one end shut. Trim the corners off before you turn them inside out.


3) Still with me? Once you've got all your Taggie bits done go make a sandwich. (Okay, if you really need a PB&J I'll wait... did you wash your hands?) Pin all your Loops and Tags to the Right side (ie: the fuzzy side of the chenille) of your BACK piece and make sure their ends hang over the edge a bit (to ensure they get caught in the seam correctly), they're all pinned towards the inside, and that none of them sneak off the opposite edge (example: in the photo below the long yellow knotted tag on the bottom is dangerously close to the Opposite edge and will most likely be sewn into both edges - not a good idea, trust me) if you need to keep them safe pin 'em down in the middle.

4) Once everything is pinned in place - lay it face down (think right sides together) on Top of your Patchwork piece. Leave all the pins in there but add some more and pin everything together - making a sandwich.

5) Sew the sandwich together. Remember to leave a gap roughly 1.5 inches to turn it inside out. Now this is where that Cool Trick comes in. Bulky sandwiches sometimes shift with the feed dogs even if they're pinned. If you leave one side of your sandwich larger than the other you don't have to worry about your edges being spot on even while you sew them together. You can clearly see what's going on, thus know everything is being caught in the seam. Before turning it inside out, trim the excess off the larger piece. Cool no?

6) Stuff it! Any sort of poly fiber fill will do just fine. Note about stuffing: If you want to avoid the cellulite look on your new softie use one huge wad of stuffing. Meaning grab insanely more than you think you'll need - instead of using a little and then a little more and a still a little more...we're talking one enormous hunk of filling. You can always pull off the extra but this makes the stuffing nice and smooth and alleviates the lumpy bumpy appearance. Then before you stitch up your opening with a nice hidden stitch add a squeaker and/or small rattle object in the center. Voila!


See what I mean ...easy peasy lemon squeazy! Go knock yourself out and make a few. Remember to not be so fussy about every little detail and have some fun :) Thanks for visiting and sticking through such an insanely loooong post - enjoy!